

LangGraph API 自动处理检查点 使用 LangGraph API 时,您无需手动实现或配置检查点。API 在后台为您处理所有持久化基础设施。
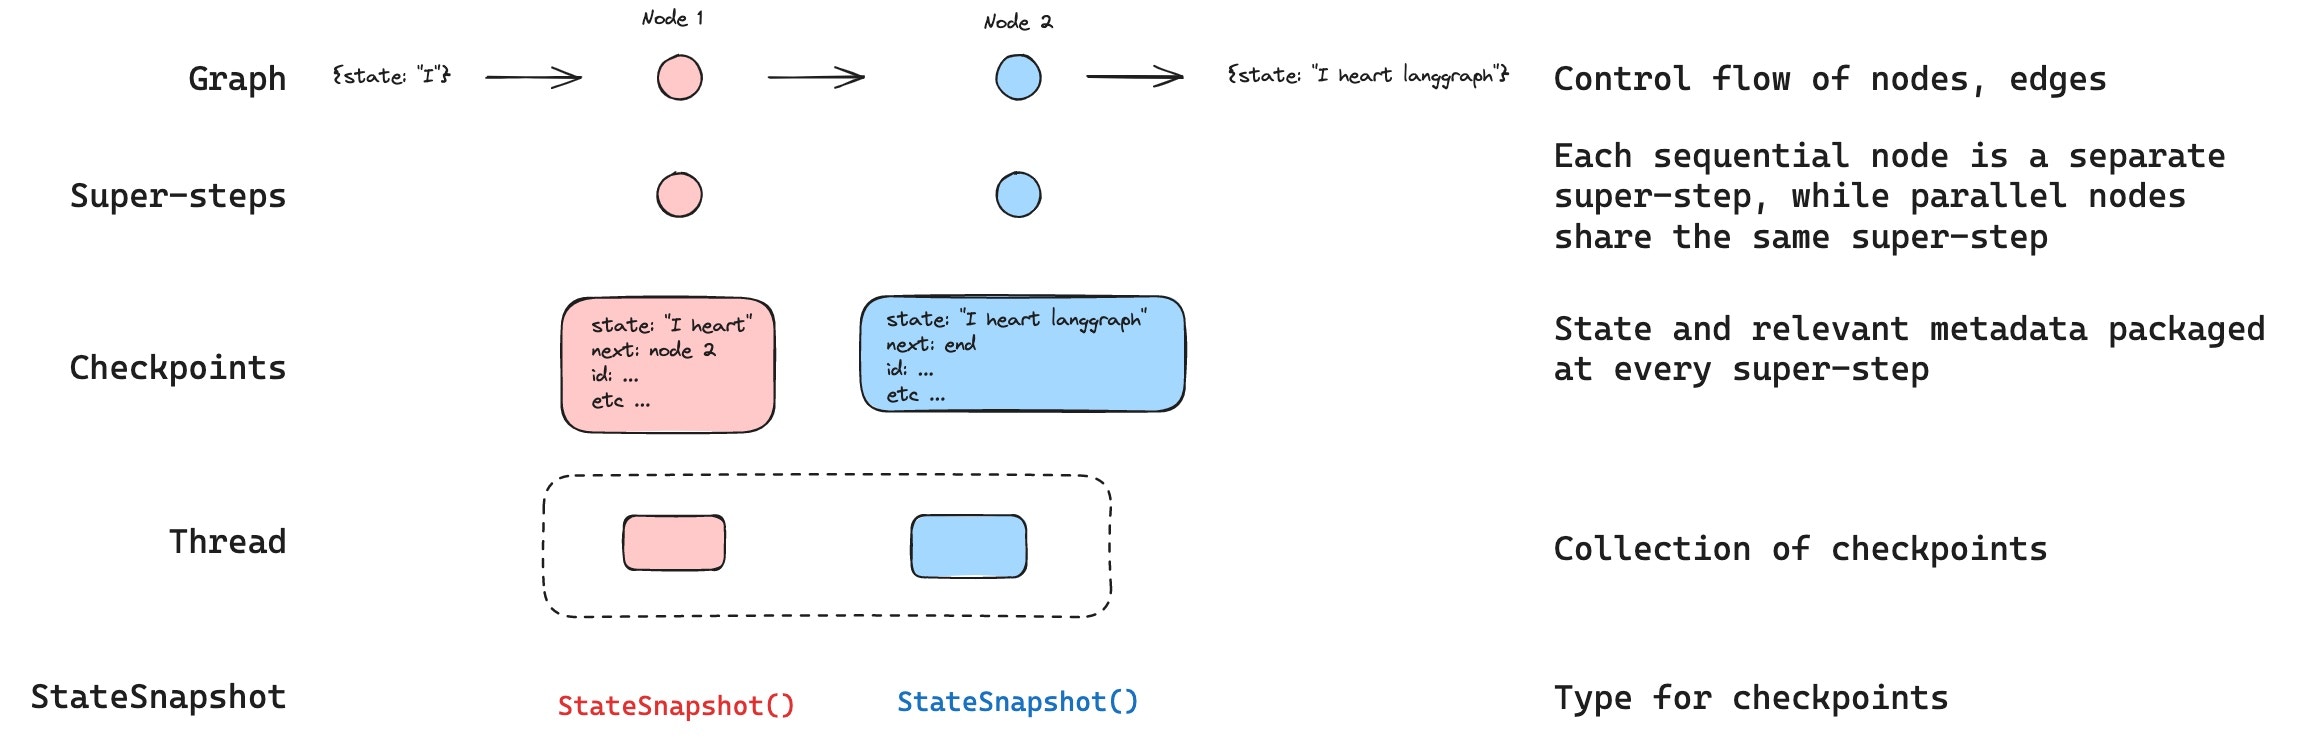
线程
线程是检查点保存的每个检查点唯一的 ID 或线程标识符。它包含一系列 运行 的累积状态。当运行执行时,助手底层图的 状态 将被持久化到线程中。 当使用检查点调用图时,您必须在配置的 `configurable` 部分中指定 `thread_id`。检查点
线程在特定时间点的状态称为检查点。检查点是在每个超步骤保存的图状态快照,由具有以下关键属性的 `StateSnapshot` 对象表示config: 与此检查点关联的配置。metadata: 与此检查点关联的元数据。values: 此时刻状态通道的值。next将在图中执行的节点名称元组。tasks: 包含要执行的后续任务信息的 `PregelTask` 对象元组。如果之前尝试过该步骤,它将包含错误信息。如果图在节点内 动态 中断,则任务将包含与中断相关的额外数据。
- 空检查点,其中
START作为下一个要执行的节点 - 检查点,包含用户输入
{'foo': '', 'bar': []}和nodeA作为下一个要执行的节点 - 检查点,包含
nodeA的输出{'foo': 'a', 'bar': ['a']}和nodeB作为下一个要执行的节点 - 检查点,包含
nodeB的输出{'foo': 'b', 'bar': ['a', 'b']},并且没有下一个要执行的节点
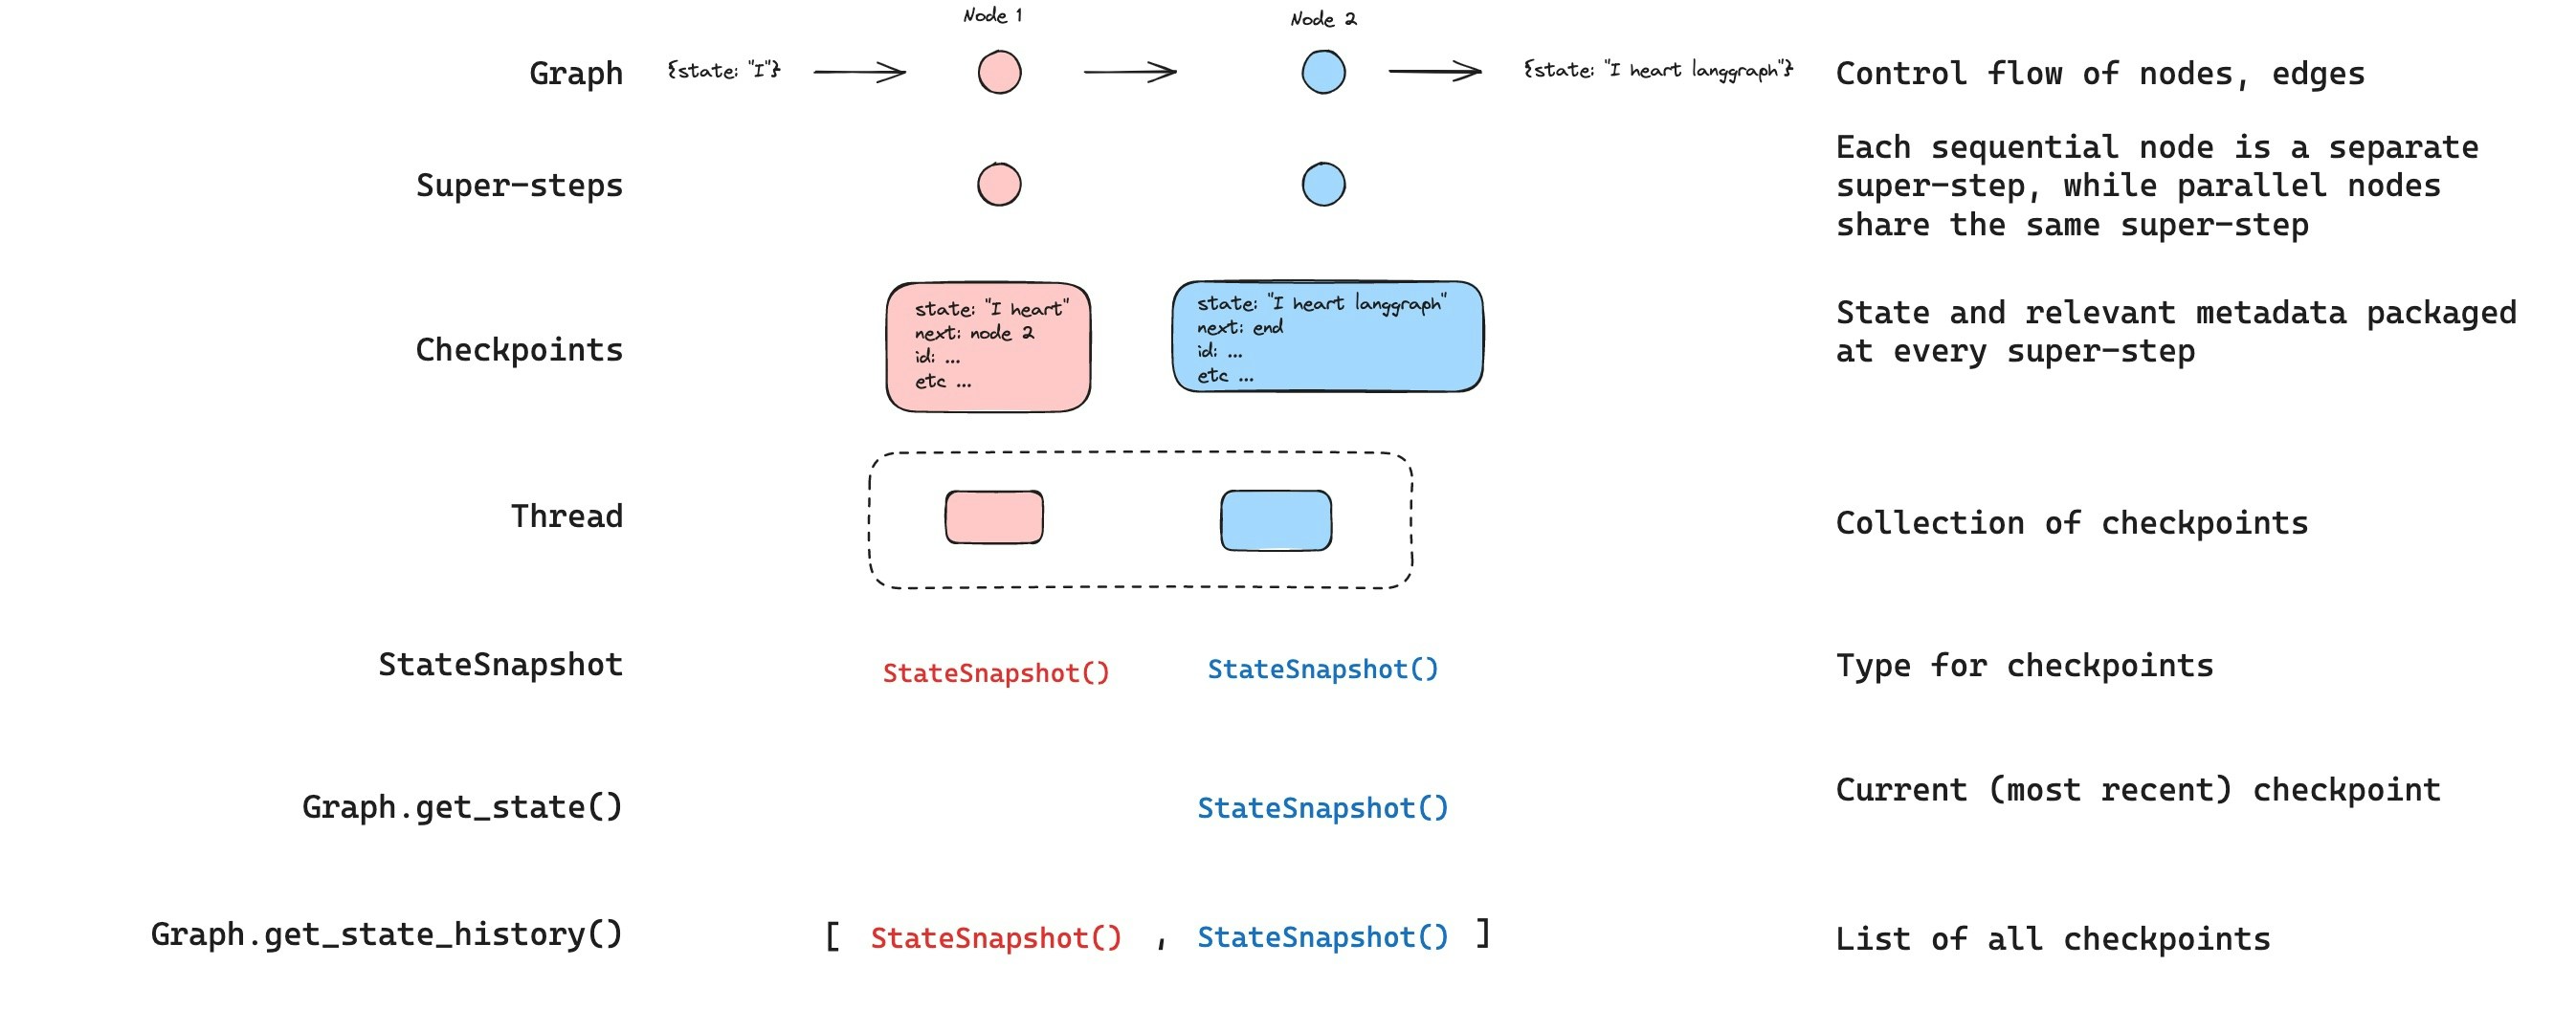
获取状态
与保存的图状态交互时,您必须指定一个 线程标识符。您可以通过调用graph.getState(config) 查看图的最新状态。这将返回一个 StateSnapshot 对象,该对象对应于配置中提供的线程 ID 关联的最新检查点,或者(如果提供了)线程的检查点 ID 关联的检查点。
getState 的输出将如下所示
获取状态历史
您可以通过调用graph.getStateHistory(config) 获取给定线程的完整图执行历史记录。这将返回一个与配置中提供的线程 ID 相关联的 StateSnapshot 对象列表。重要的是,检查点将按时间顺序排列,最新的检查点/StateSnapshot 排在列表的第一位。
getStateHistory 的输出将如下所示
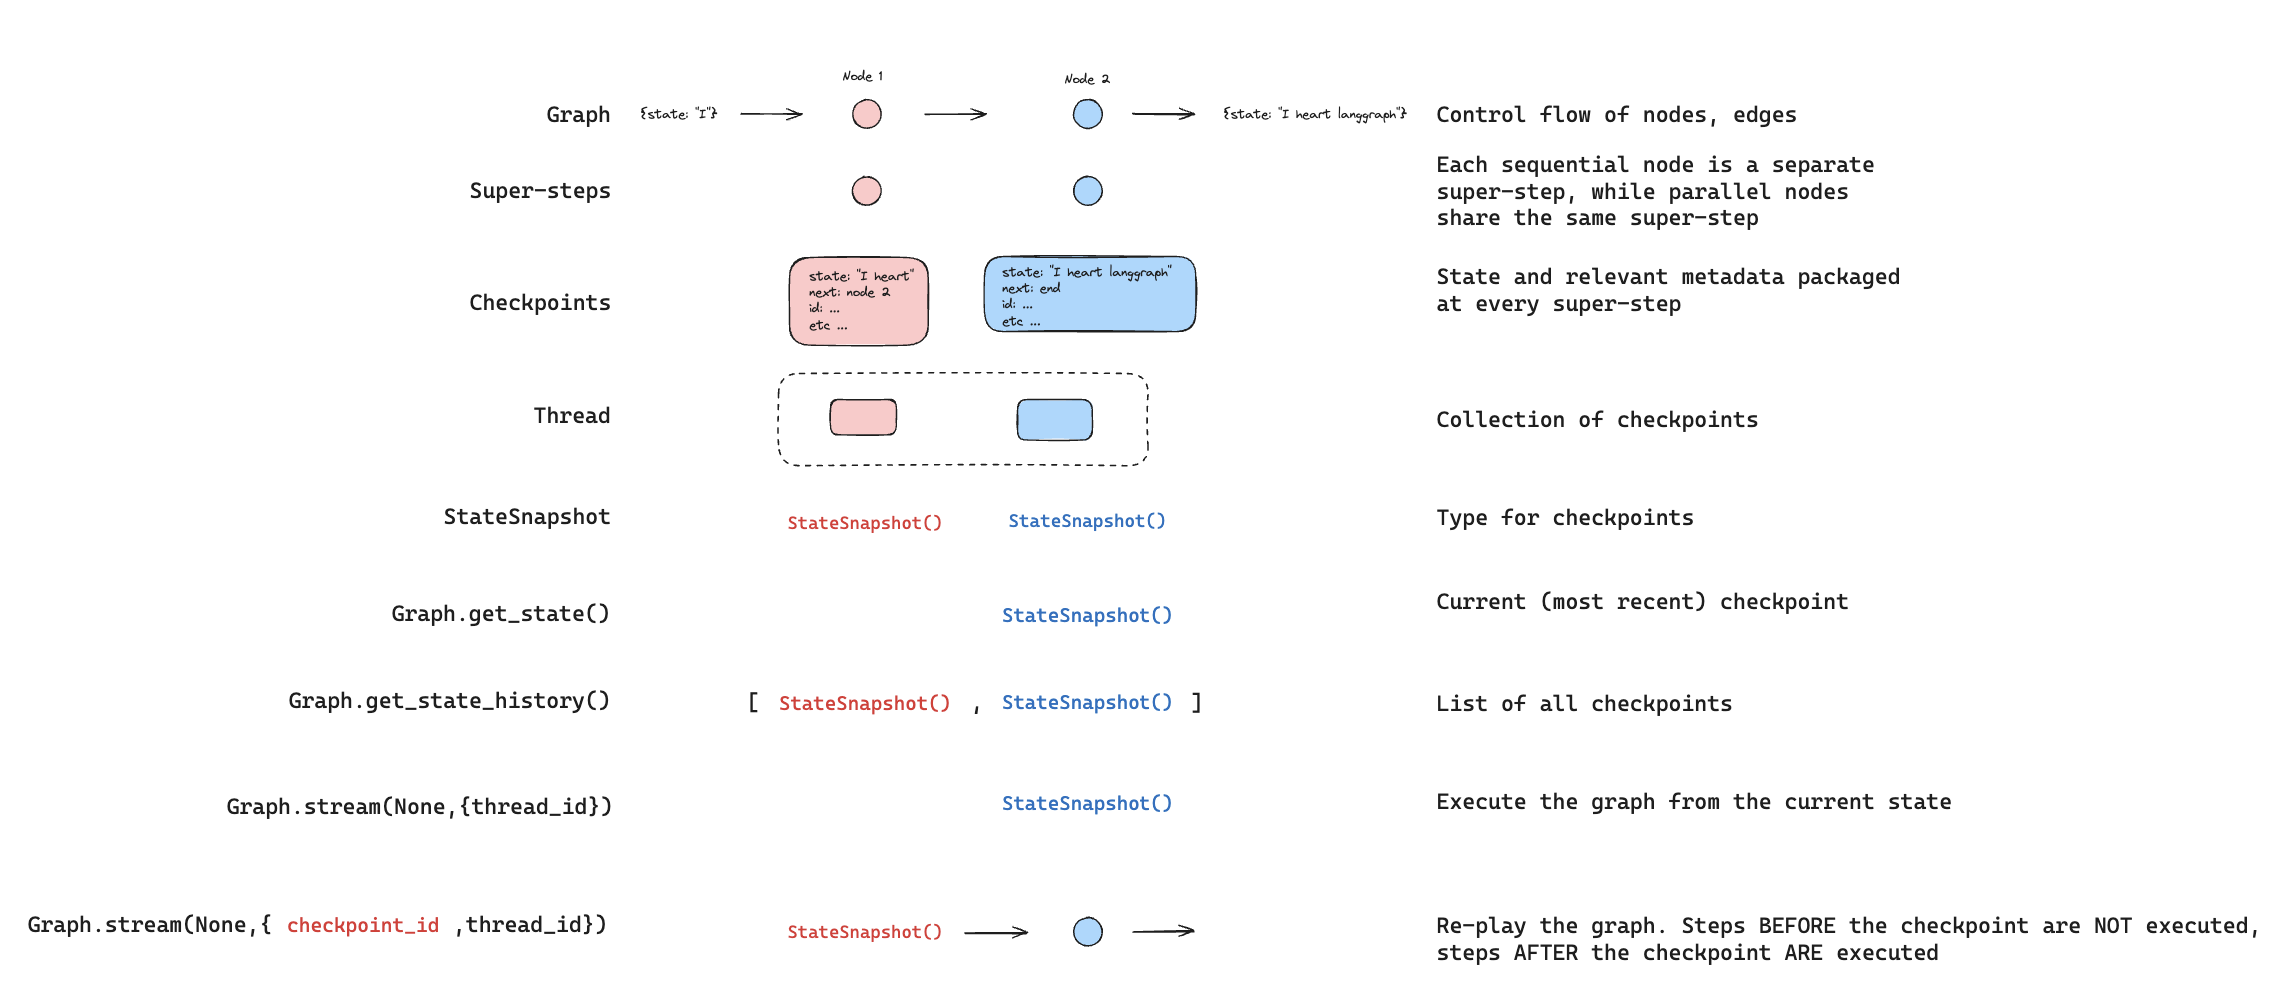
重播
还可以回放之前的图执行。如果我们使用 `thread_id` 和 `checkpoint_id` 调用图的 `invoke` 方法,那么我们将重播与 `checkpoint_id` 对应的检查点之前已执行的步骤,并且只执行检查点之后的步骤。thread_id是线程的 ID。checkpoint_id是指线程内特定检查点的标识符。
更新状态
除了从特定 `checkpoints` 重播图之外,我们还可以编辑图状态。我们使用graph.updateState() 来实现这一点。此方法接受三个不同的参数
配置
配置应包含 `thread_id`,指定要更新的线程。当只传递 `thread_id` 时,我们更新(或分支)当前状态。或者,如果包含 `checkpoint_id` 字段,则分支该选定的检查点。
值
这些值将用于更新状态。请注意,此更新的处理方式与来自节点的任何更新完全相同。这意味着这些值将被传递给 reducer 函数(如果为图状态中的某些通道定义了这些函数)。这意味着 update_state 不会自动覆盖每个通道的通道值,而仅覆盖没有 reducer 的通道。让我们来看一个示例。 假设您已使用以下模式定义了图的状态(请参阅上面的完整示例):as_node
调用 updateState 时,您可以选择指定最后一项是 asNode。如果提供它,更新将像来自节点 asNode 一样应用。如果未提供 asNode,则它将设置为更新状态的最后一个节点(如果不明确)。这很重要,因为要执行的下一步取决于最后一个提供更新的节点,因此这可用于控制下一个执行的节点。请参阅此 时间旅行操作指南,了解有关分支状态的更多信息。 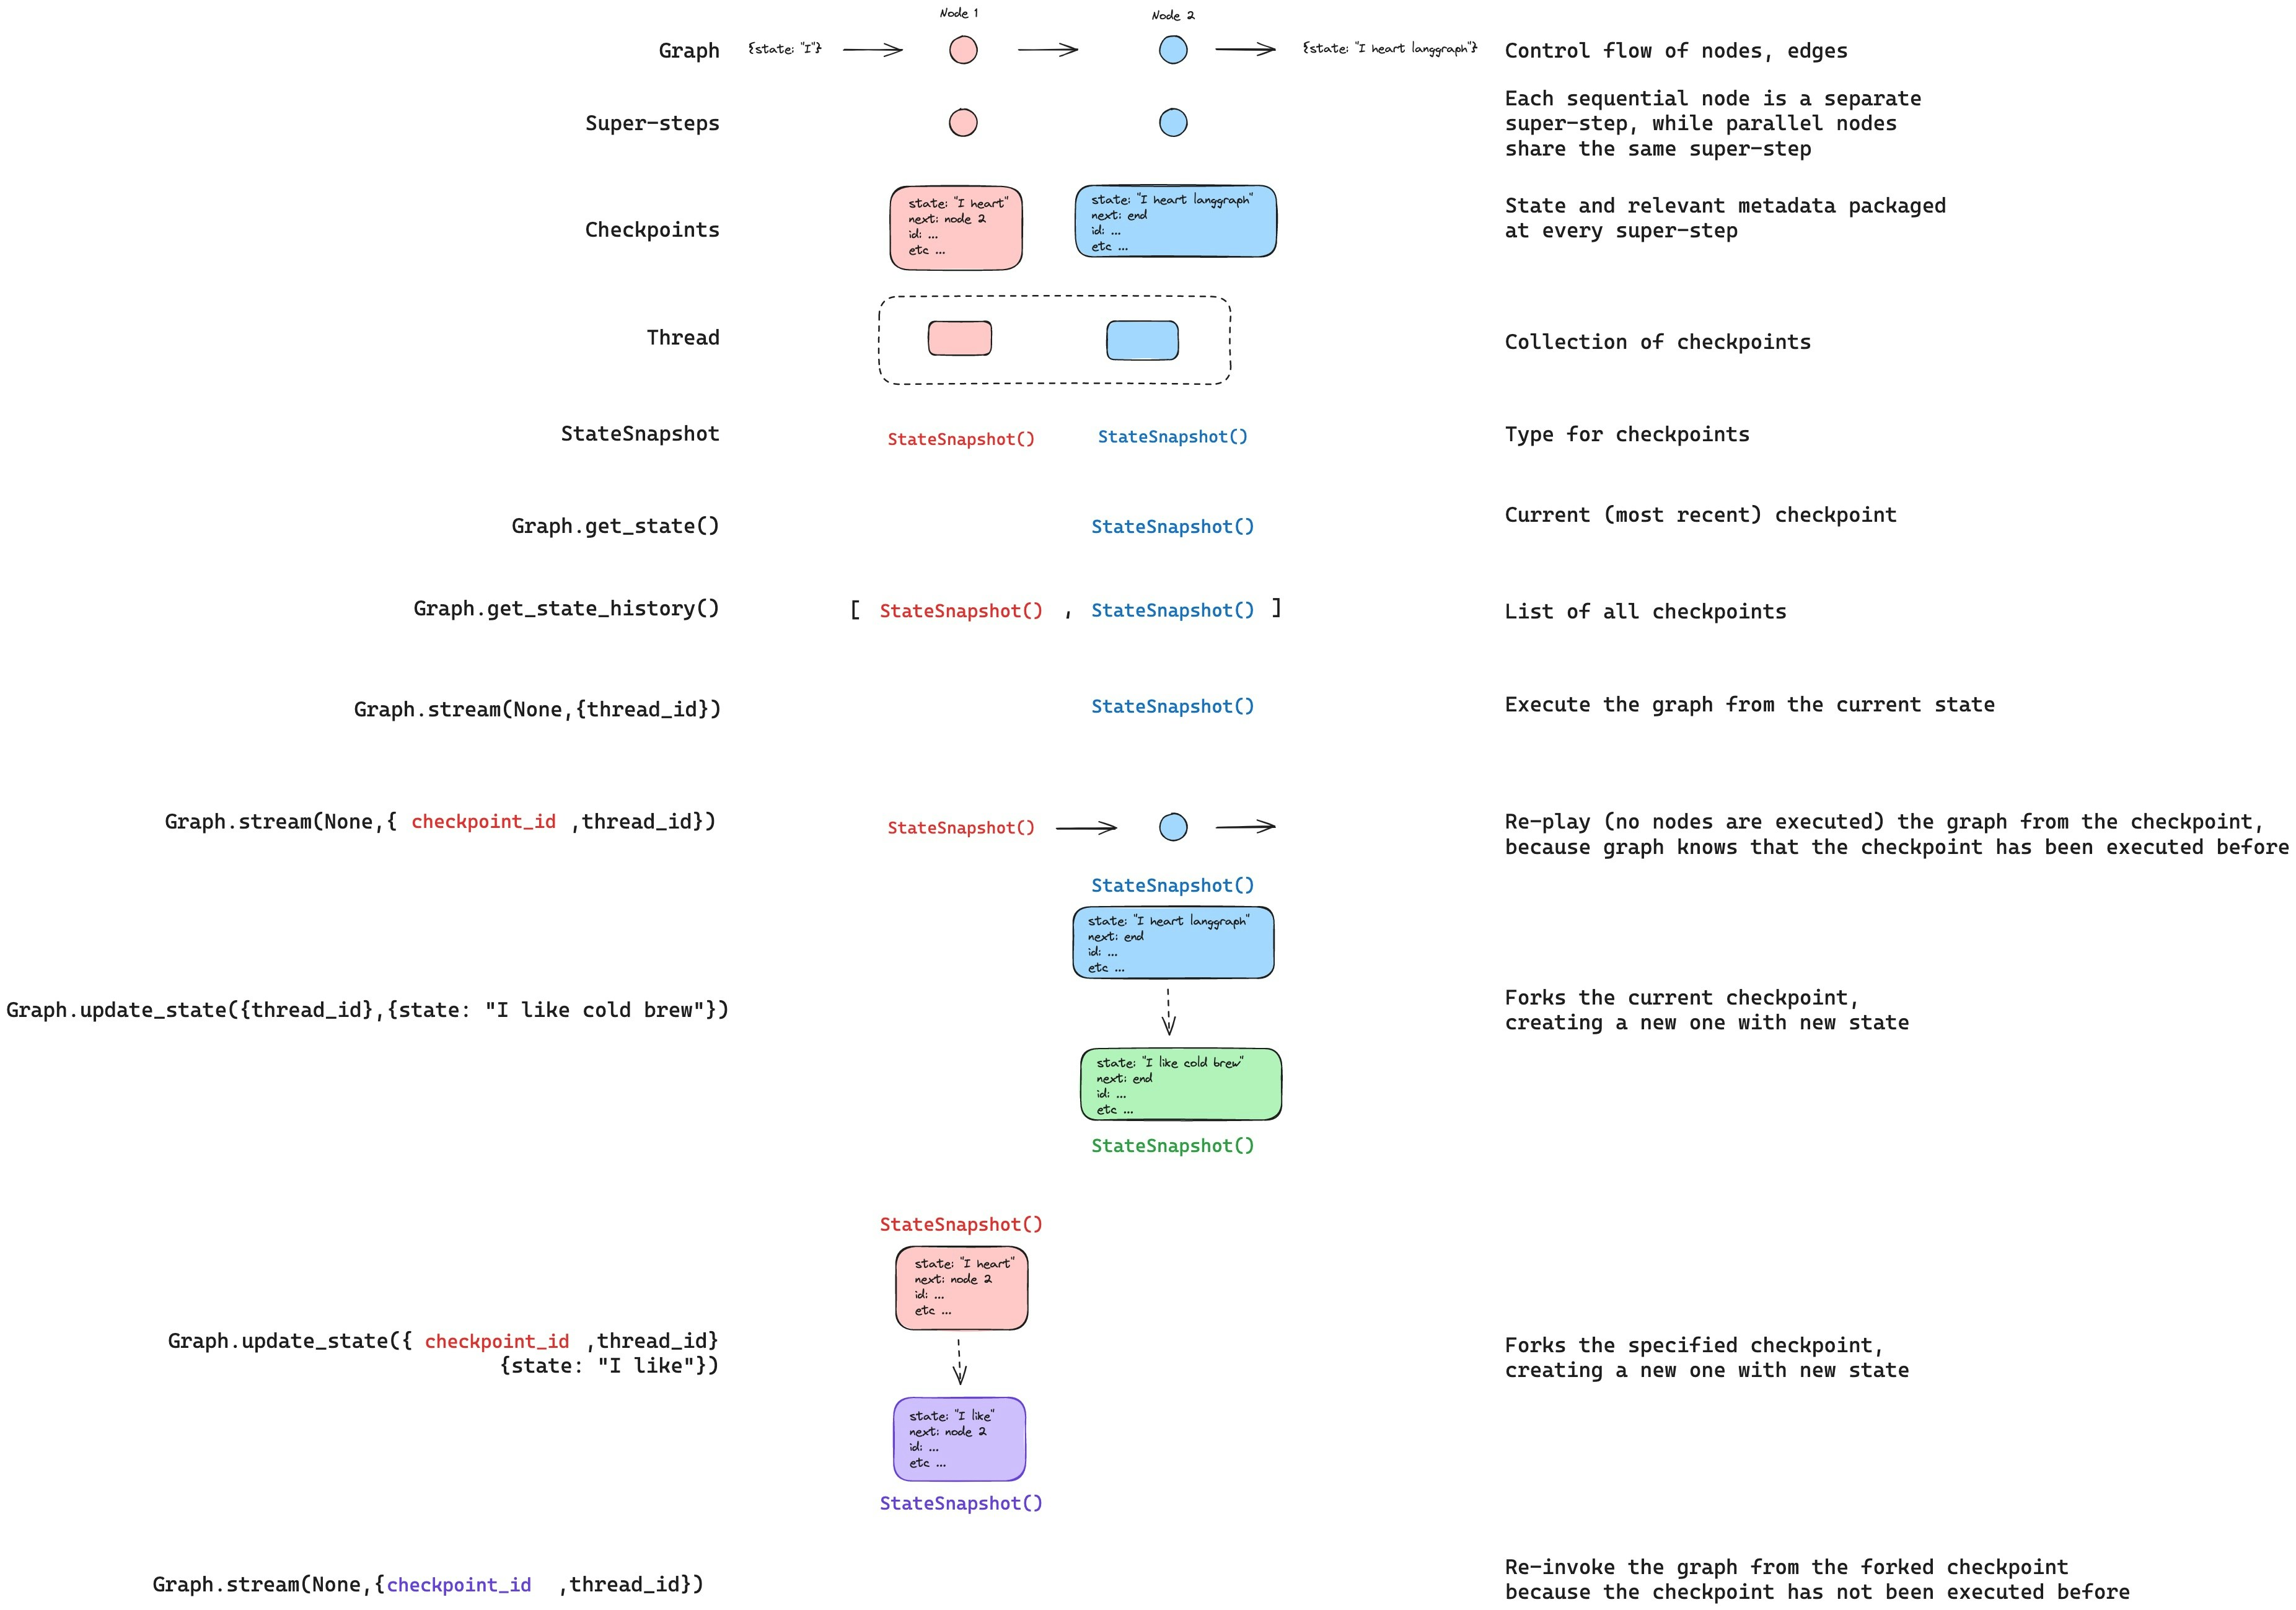
内存存储
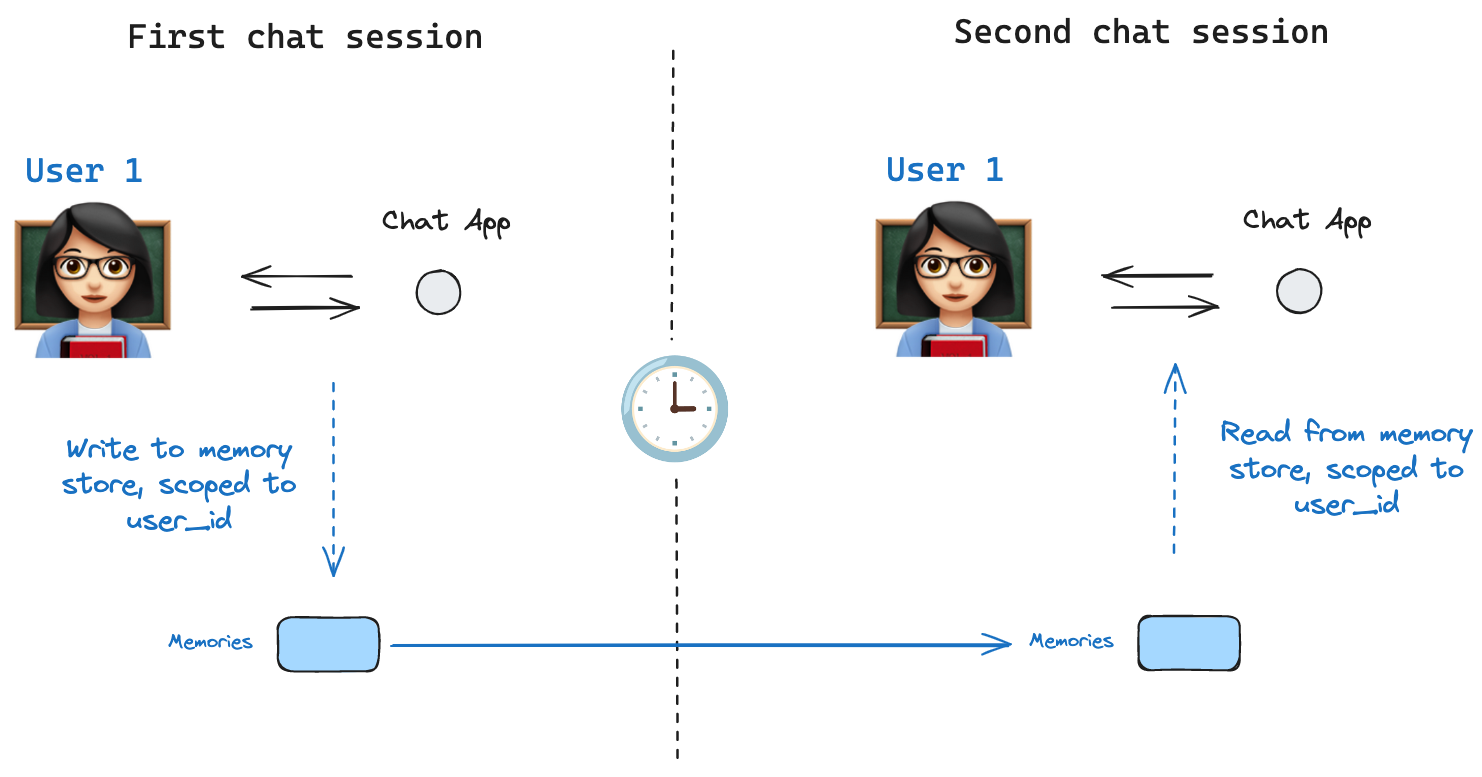
Store 接口。作为示例,我们可以定义一个 InMemoryStore 来存储跨线程的用户信息。我们像以前一样,简单地使用检查点和我们的新 in_memory_store 变量编译图。LangGraph API 自动处理存储 使用 LangGraph API 时,您无需手动实现或配置存储。API 在后台为您处理所有存储基础设施。
基本用法
首先,让我们在不使用 LangGraph 的情况下单独展示这一点。store.put 方法将记忆保存到存储中的命名空间。当我们这样做时,我们指定了如上定义的命名空间,以及一个记忆的键值对:键只是记忆的唯一标识符(`memory_id`),值(一个字典)是记忆本身。
value: 此记忆的值key: 此命名空间中此记忆的唯一键namespace: 字符串列表,此记忆类型的命名空间createdAt: 此记忆创建的时间戳updatedAt: 此记忆更新的时间戳
语义搜索
除了简单的检索之外,存储还支持语义搜索,允许您根据含义而不是精确匹配来查找记忆。要启用此功能,请使用嵌入模型配置存储在 LangGraph 中使用
完成所有这些后,我们在 LangGraph 中使用 `memoryStore`。 `memoryStore` 与检查点器协同工作:检查点器将状态保存到线程中,如上所述,而 `memoryStore` 允许我们存储任意信息以供跨线程访问。我们按照如下方式,使用检查点器和 `memoryStore` 编译图。store.search 方法获取记忆。请记住,记忆以可转换为字典的对象列表形式返回。
langgraph.json 文件中的索引设置。例如
检查点库
在底层,检查点功能由符合BaseCheckpointSaver 接口的检查点对象提供支持。LangGraph 提供了多种检查点实现,所有这些都通过独立的、可安装的库实现
@langchain/langgraph-checkpoint:检查点保存器的基本接口(BaseCheckpointSaver)和序列化/反序列化接口(SerializerProtocol)。包括用于实验的内存中检查点实现(MemorySaver)。LangGraph 随附@langchain/langgraph-checkpoint。@langchain/langgraph-checkpoint-sqlite: LangGraph 检查点的实现,使用 SQLite 数据库 (SqliteSaver)。非常适合实验和本地工作流。需要单独安装。@langchain/langgraph-checkpoint-postgres:一个高级检查点,使用 Postgres 数据库 (PostgresSaver),在 LangSmith 中使用。非常适合在生产环境中使用。需要单独安装。
检查点接口
每个检查点都符合BaseCheckpointSaver 接口并实现以下方法
.put- 存储带其配置和元数据的检查点。.putWrites- 存储与检查点链接的中间写入(即 待定写入)。.getTuple- 使用给定配置(`thread_id` 和 `checkpoint_id`)获取检查点元组。这用于在graph.getState()中填充 `StateSnapshot`。.list- 列出符合给定配置和过滤条件的检查点。这用于在graph.getStateHistory()中填充状态历史记录
序列化器
当检查点保存图状态时,它们需要序列化状态中的通道值。这是通过序列化器对象完成的。@langchain/langgraph-checkpoint 定义了实现序列化器的协议,并提供了一个默认实现,可以处理各种类型,包括 LangChain 和 LangGraph 原语、日期时间、枚举等。能力
人工干预
首先,检查点通过允许人工检查、中断和批准图步骤来促进人机协作工作流。这些工作流需要检查点,因为人必须能够随时查看图的状态,并且图必须能够在人对状态进行任何更新后恢复执行。有关示例,请参阅操作指南。内存
其次,检查点允许在交互之间建立“记忆”。在重复的人机交互(如对话)中,任何后续消息都可以发送到该线程,该线程将保留其对先前消息的记忆。有关如何使用检查点添加和管理对话记忆的信息,请参阅添加记忆。时间旅行
第三,检查点允许“时间旅行”,让用户重播先前的图执行,以审查和/或调试特定图步骤。此外,检查点使得可以在任意检查点处分支图状态,以探索替代轨迹。容错
最后,检查点还提供了容错和错误恢复:如果一个或多个节点在给定超步骤失败,您可以从上一个成功步骤重新启动图。此外,当图节点在给定超步骤中执行失败时,LangGraph 会存储在该超步骤中成功完成的任何其他节点的待处理检查点写入,以便每当我们从该超步骤恢复图执行时,我们都不会重新运行成功的节点。待定写入
此外,当图节点在给定超步骤中执行失败时,LangGraph 会存储在该超步骤中成功完成的任何其他节点的待处理检查点写入,以便每当我们从该超步骤恢复图执行时,我们都不会重新运行成功的节点。以编程方式连接这些文档到 Claude、VSCode 等,通过 MCP 获取实时答案。