for message in result["messages"]:
    message.pretty_print()
复制
向 AI 提问
================================ Human Message ================================Hi================================== Ai Message ==================================Hello!
from typing_extensions import Annotateddef add(left, right): """Can also import `add` from the `operator` built-in.""" return left + rightclass State(TypedDict): messages: Annotated[list[AnyMessage], add] extra_field: int
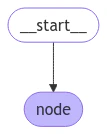
from langgraph.graph import STARTgraph = StateGraph(State).add_node(node).add_edge(START, "node").compile()result = graph.invoke({"messages": [HumanMessage("Hi")]})for message in result["messages"]: message.pretty_print()
复制
向 AI 提问
================================ Human Message ================================Hi================================== Ai Message ==================================Hello!
input_message = {"role": "user", "content": "Hi"} result = graph.invoke({"messages": [input_message]})for message in result["messages"]: message.pretty_print()
复制
向 AI 提问
================================ Human Message ================================Hi================================== Ai Message ==================================Hello!
from langgraph.graph import StateGraph, START, ENDfrom typing_extensions import TypedDict# Define the schema for the inputclass InputState(TypedDict): question: str# Define the schema for the outputclass OutputState(TypedDict): answer: str# Define the overall schema, combining both input and outputclass OverallState(InputState, OutputState): pass# Define the node that processes the input and generates an answerdef answer_node(state: InputState): # Example answer and an extra key return {"answer": "bye", "question": state["question"]}# Build the graph with input and output schemas specifiedbuilder = StateGraph(OverallState, input_schema=InputState, output_schema=OutputState)builder.add_node(answer_node) # Add the answer nodebuilder.add_edge(START, "answer_node") # Define the starting edgebuilder.add_edge("answer_node", END) # Define the ending edgegraph = builder.compile() # Compile the graph# Invoke the graph with an input and print the resultprint(graph.invoke({"question": "hi"}))
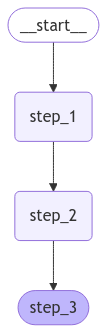
from langgraph.graph import StateGraph, START, ENDfrom typing_extensions import TypedDict# The overall state of the graph (this is the public state shared across nodes)class OverallState(TypedDict): a: str# Output from node_1 contains private data that is not part of the overall stateclass Node1Output(TypedDict): private_data: str# The private data is only shared between node_1 and node_2def node_1(state: OverallState) -> Node1Output: output = {"private_data": "set by node_1"} print(f"Entered node `node_1`:\n\tInput: {state}.\n\tReturned: {output}") return output# Node 2 input only requests the private data available after node_1class Node2Input(TypedDict): private_data: strdef node_2(state: Node2Input) -> OverallState: output = {"a": "set by node_2"} print(f"Entered node `node_2`:\n\tInput: {state}.\n\tReturned: {output}") return output# Node 3 only has access to the overall state (no access to private data from node_1)def node_3(state: OverallState) -> OverallState: output = {"a": "set by node_3"} print(f"Entered node `node_3`:\n\tInput: {state}.\n\tReturned: {output}") return output# Connect nodes in a sequence# node_2 accepts private data from node_1, whereas# node_3 does not see the private data.builder = StateGraph(OverallState).add_sequence([node_1, node_2, node_3])builder.add_edge(START, "node_1")graph = builder.compile()# Invoke the graph with the initial stateresponse = graph.invoke( { "a": "set at start", })print()print(f"Output of graph invocation: {response}")
复制
向 AI 提问
Entered node `node_1`: Input: {'a': 'set at start'}. Returned: {'private_data': 'set by node_1'}Entered node `node_2`: Input: {'private_data': 'set by node_1'}. Returned: {'a': 'set by node_2'}Entered node `node_3`: Input: {'a': 'set by node_2'}. Returned: {'a': 'set by node_3'}Output of graph invocation: {'a': 'set by node_3'}
from langgraph.graph import StateGraph, START, ENDfrom typing_extensions import TypedDictfrom pydantic import BaseModel# The overall state of the graph (this is the public state shared across nodes)class OverallState(BaseModel): a: strdef node(state: OverallState): return {"a": "goodbye"}# Build the state graphbuilder = StateGraph(OverallState)builder.add_node(node) # node_1 is the first nodebuilder.add_edge(START, "node") # Start the graph with node_1builder.add_edge("node", END) # End the graph after node_1graph = builder.compile()# Test the graph with a valid inputgraph.invoke({"a": "hello"})
使用无效输入调用图
复制
向 AI 提问
try: graph.invoke({"a": 123}) # Should be a stringexcept Exception as e: print("An exception was raised because `a` is an integer rather than a string.") print(e)
复制
向 AI 提问
An exception was raised because `a` is an integer rather than a string.1 validation error for OverallStatea Input should be a valid string [type=string_type, input_value=123, input_type=int] For further information visit https://errors.pydantic.dev/2.9/v/string_type
有关 Pydantic 模型状态的其他功能,请参见下文
序列化行为
当使用 Pydantic 模型作为状态模式时,了解序列化如何工作很重要,尤其是在以下情况:
将 Pydantic 对象作为输入传递
接收图的输出
使用嵌套的 Pydantic 模型
让我们看看这些行为的实际应用。
复制
向 AI 提问
from langgraph.graph import StateGraph, START, ENDfrom pydantic import BaseModelclass NestedModel(BaseModel): value: strclass ComplexState(BaseModel): text: str count: int nested: NestedModeldef process_node(state: ComplexState): # Node receives a validated Pydantic object print(f"Input state type: {type(state)}") print(f"Nested type: {type(state.nested)}") # Return a dictionary update return {"text": state.text + " processed", "count": state.count + 1}# Build the graphbuilder = StateGraph(ComplexState)builder.add_node("process", process_node)builder.add_edge(START, "process")builder.add_edge("process", END)graph = builder.compile()# Create a Pydantic instance for inputinput_state = ComplexState(text="hello", count=0, nested=NestedModel(value="test"))print(f"Input object type: {type(input_state)}")# Invoke graph with a Pydantic instanceresult = graph.invoke(input_state)print(f"Output type: {type(result)}")print(f"Output content: {result}")# Convert back to Pydantic model if neededoutput_model = ComplexState(**result)print(f"Converted back to Pydantic: {type(output_model)}")
================================ Human Message ================================hi================================== Ai Message ==================================Ciao! Come posso aiutarti oggi?
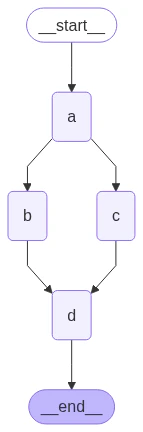
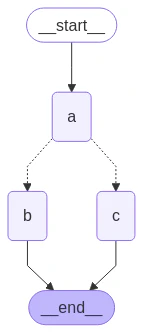
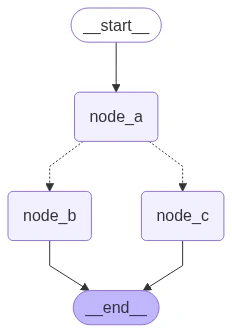
如果您的扇出应根据状态在运行时变化,您可以使用add_conditional_edges来使用图状态选择一个或多个路径。请参阅下面的示例,其中节点 a 生成一个状态更新,该更新决定了以下节点。
复制
向 AI 提问
import operatorfrom typing import Annotated, Literal, Sequencefrom typing_extensions import TypedDictfrom langgraph.graph import StateGraph, START, ENDclass State(TypedDict): aggregate: Annotated[list, operator.add] # Add a key to the state. We will set this key to determine # how we branch. which: strdef a(state: State): print(f'Adding "A" to {state["aggregate"]}') return {"aggregate": ["A"], "which": "c"} def b(state: State): print(f'Adding "B" to {state["aggregate"]}') return {"aggregate": ["B"]}def c(state: State): print(f'Adding "C" to {state["aggregate"]}') return {"aggregate": ["C"]}builder = StateGraph(State)builder.add_node(a)builder.add_node(b)builder.add_node(c)builder.add_edge(START, "a")builder.add_edge("b", END)builder.add_edge("c", END)def conditional_edge(state: State) -> Literal["b", "c"]: # Fill in arbitrary logic here that uses the state # to determine the next node return state["which"]builder.add_conditional_edges("a", conditional_edge) graph = builder.compile()
复制
向 AI 提问
from IPython.display import Image, displaydisplay(Image(graph.get_graph().draw_mermaid_png()))
复制
向 AI 提问
result = graph.invoke({"aggregate": []})print(result)
复制
向 AI 提问
Adding "A" to []Adding "C" to ['A']{'aggregate': ['A', 'C'], 'which': 'c'}
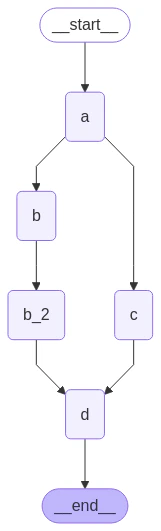
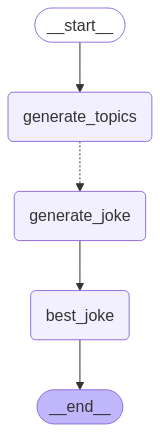
LangGraph 支持使用 Send API 进行 Map-Reduce 和其他高级分支模式。这是一个如何使用它的示例
复制
向 AI 提问
from langgraph.graph import StateGraph, START, ENDfrom langgraph.types import Sendfrom typing_extensions import TypedDict, Annotatedimport operatorclass OverallState(TypedDict): topic: str subjects: list[str] jokes: Annotated[list[str], operator.add] best_selected_joke: strdef generate_topics(state: OverallState): return {"subjects": ["lions", "elephants", "penguins"]}def generate_joke(state: OverallState): joke_map = { "lions": "Why don't lions like fast food? Because they can't catch it!", "elephants": "Why don't elephants use computers? They're afraid of the mouse!", "penguins": "Why don't penguins like talking to strangers at parties? Because they find it hard to break the ice." } return {"jokes": [joke_map[state["subject"]]]}def continue_to_jokes(state: OverallState): return [Send("generate_joke", {"subject": s}) for s in state["subjects"]]def best_joke(state: OverallState): return {"best_selected_joke": "penguins"}builder = StateGraph(OverallState)builder.add_node("generate_topics", generate_topics)builder.add_node("generate_joke", generate_joke)builder.add_node("best_joke", best_joke)builder.add_edge(START, "generate_topics")builder.add_conditional_edges("generate_topics", continue_to_jokes, ["generate_joke"])builder.add_edge("generate_joke", "best_joke")builder.add_edge("best_joke", END)graph = builder.compile()
复制
向 AI 提问
from IPython.display import Image, displaydisplay(Image(graph.get_graph().draw_mermaid_png()))
复制
向 AI 提问
# Call the graph: here we call it to generate a list of jokesfor step in graph.stream({"topic": "animals"}): print(step)
复制
向 AI 提问
{'generate_topics': {'subjects': ['lions', 'elephants', 'penguins']}}{'generate_joke': {'jokes': ["Why don't lions like fast food? Because they can't catch it!"]}}{'generate_joke': {'jokes': ["Why don't elephants use computers? They're afraid of the mouse!"]}}{'generate_joke': {'jokes': ['Why don't penguins like talking to strangers at parties? Because they find it hard to break the ice.']}}{'best_joke': {'best_selected_joke': 'penguins'}}
from langgraph.errors import GraphRecursionErrortry: graph.invoke(inputs, {"recursion_limit": 3})except GraphRecursionError: print("Recursion Error")
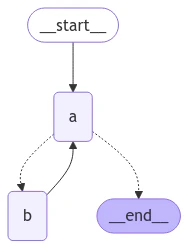
让我们定义一个带简单循环的图。请注意,我们使用条件边来实现终止条件。
复制
向 AI 提问
import operatorfrom typing import Annotated, Literalfrom typing_extensions import TypedDictfrom langgraph.graph import StateGraph, START, ENDclass State(TypedDict): # The operator.add reducer fn makes this append-only aggregate: Annotated[list, operator.add]def a(state: State): print(f'Node A sees {state["aggregate"]}') return {"aggregate": ["A"]}def b(state: State): print(f'Node B sees {state["aggregate"]}') return {"aggregate": ["B"]}# Define nodesbuilder = StateGraph(State)builder.add_node(a)builder.add_node(b)# Define edgesdef route(state: State) -> Literal["b", END]: if len(state["aggregate"]) < 7: return "b" else: return ENDbuilder.add_edge(START, "a")builder.add_conditional_edges("a", route)builder.add_edge("b", "a")graph = builder.compile()
复制
向 AI 提问
from IPython.display import Image, displaydisplay(Image(graph.get_graph().draw_mermaid_png()))
这种架构类似于ReAct 代理,其中节点 "a" 是一个工具调用模型,节点 "b" 代表工具。在我们的 route 条件边中,我们指定在状态中的 "aggregate" 列表超过阈值长度后应该结束。调用图,我们看到我们在节点 "a" 和 "b" 之间交替,直到达到终止条件。
复制
向 AI 提问
graph.invoke({"aggregate": []})
复制
向 AI 提问
Node A sees []Node B sees ['A']Node A sees ['A', 'B']Node B sees ['A', 'B', 'A']Node A sees ['A', 'B', 'A', 'B']Node B sees ['A', 'B', 'A', 'B', 'A']Node A sees ['A', 'B', 'A', 'B', 'A', 'B']
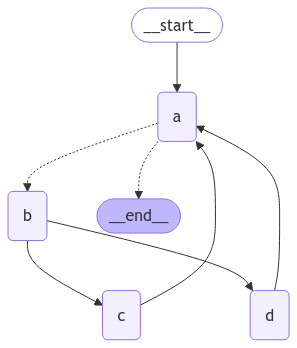
我们有一个四步的超步循环,其中节点 C 和 D 并发执行。像之前一样调用图,我们看到在达到终止条件之前,我们完成了两个完整的“循环”:
复制
向 AI 提问
result = graph.invoke({"aggregate": []})
复制
向 AI 提问
Node A sees []Node B sees ['A']Node D sees ['A', 'B']Node C sees ['A', 'B']Node A sees ['A', 'B', 'C', 'D']Node B sees ['A', 'B', 'C', 'D', 'A']Node D sees ['A', 'B', 'C', 'D', 'A', 'B']Node C sees ['A', 'B', 'C', 'D', 'A', 'B']Node A sees ['A', 'B', 'C', 'D', 'A', 'B', 'C', 'D']
然而,如果我们将递归限制设置为四,我们只完成一个循环,因为每个循环是四个超步。
复制
向 AI 提问
from langgraph.errors import GraphRecursionErrortry: result = graph.invoke({"aggregate": []}, {"recursion_limit": 4})except GraphRecursionError: print("Recursion Error")
复制
向 AI 提问
Node A sees []Node B sees ['A']Node C sees ['A', 'B']Node D sees ['A', 'B']Node A sees ['A', 'B', 'C', 'D']Recursion Error
def my_node(state: State) -> Command[Literal["my_other_node"]]:
    return Command(
        # state update
        update={"foo": "bar"},
        # control flow
        goto="my_other_node"
    )
我们将在下面展示一个端到端示例。让我们创建一个包含 3 个节点的简单图:A、B 和 C。我们将首先执行节点 A,然后根据节点 A 的输出决定下一步是前往节点 B 还是节点 C。
复制
向 AI 提问
import randomfrom typing_extensions import TypedDict, Literalfrom langgraph.graph import StateGraph, STARTfrom langgraph.types import Command# Define graph stateclass State(TypedDict): foo: str# Define the nodesdef node_a(state: State) -> Command[Literal["node_b", "node_c"]]: print("Called A") value = random.choice(["b", "c"]) # this is a replacement for a conditional edge function if value == "b": goto = "node_b" else: goto = "node_c" # note how Command allows you to BOTH update the graph state AND route to the next node return Command( # this is the state update update={"foo": value}, # this is a replacement for an edge goto=goto, )def node_b(state: State): print("Called B") return {"foo": state["foo"] + "b"}def node_c(state: State): print("Called C") return {"foo": state["foo"] + "c"}
builder = StateGraph(State)builder.add_edge(START, "node_a")builder.add_node(node_a)builder.add_node(node_b)builder.add_node(node_c)# NOTE: there are no edges between nodes A, B and C!graph = builder.compile()
def my_node(state: State) -> Command[Literal["my_other_node"]]:
    return Command(
        update={"foo": "bar"},
        goto="other_subgraph",  # where `other_subgraph` is a node in the parent graph
        graph=Command.PARENT
    )
import operatorfrom typing_extensions import Annotatedclass State(TypedDict): # NOTE: we define a reducer here foo: Annotated[str, operator.add] def node_a(state: State): print("Called A") value = random.choice(["a", "b"]) # this is a replacement for a conditional edge function if value == "a": goto = "node_b" else: goto = "node_c" # note how Command allows you to BOTH update the graph state AND route to the next node return Command( update={"foo": value}, goto=goto, # this tells LangGraph to navigate to node_b or node_c in the parent graph # NOTE: this will navigate to the closest parent graph relative to the subgraph graph=Command.PARENT, )subgraph = StateGraph(State).add_node(node_a).add_edge(START, "node_a").compile()def node_b(state: State): print("Called B") # NOTE: since we've defined a reducer, we don't need to manually append # new characters to existing 'foo' value. instead, reducer will append these # automatically (via operator.add) return {"foo": "b"} def node_c(state: State): print("Called C") return {"foo": "c"} builder = StateGraph(State)builder.add_edge(START, "subgraph")builder.add_node("subgraph", subgraph)builder.add_node(node_b)builder.add_node(node_c)graph = builder.compile()
一个常见的用例是从工具内部更新图状态。例如,在客户支持应用程序中,您可能希望在对话开始时根据客户的帐号或 ID 查找客户信息。要从工具更新图状态,您可以从工具返回 Command(update={"my_custom_key": "foo", "messages": [...]})
复制
向 AI 提问
@tooldef lookup_user_info(tool_call_id: Annotated[str, InjectedToolCallId], config: RunnableConfig): """Use this to look up user information to better assist them with their questions.""" user_info = get_user_info(config.get("configurable", {}).get("user_id")) return Command( update={ # update the state keys "user_info": user_info, # update the message history "messages": [ToolMessage("Successfully looked up user information", tool_call_id=tool_call_id)] } )
使用 Mermaid.Ink默认情况下,draw_mermaid_png() 使用 Mermaid.Ink 的 API 生成图表。
复制
向 AI 提问
from IPython.display import Image, displayfrom langchain_core.runnables.graph import CurveStyle, MermaidDrawMethod, NodeStylesdisplay(Image(app.get_graph().draw_mermaid_png()))
使用 Mermaid + Pyppeteer
复制
向 AI 提问
import nest_asyncionest_asyncio.apply() # Required for Jupyter Notebook to run async functionsdisplay( Image( app.get_graph().draw_mermaid_png( curve_style=CurveStyle.LINEAR, node_colors=NodeStyles(first="#ffdfba", last="#baffc9", default="#fad7de"), wrap_label_n_words=9, output_file_path=None, draw_method=MermaidDrawMethod.PYPPETEER, background_color="white", padding=10, ) ))
使用 Graphviz
复制
向 AI 提问
try: display(Image(app.get_graph().draw_png()))except ImportError: print( "You likely need to install dependencies for pygraphviz, see more here https://github.com/pygraphviz/pygraphviz/blob/main/INSTALL.txt" )